Deconstructing the Death Star: A Comprehensive Guide to the Galactic Superweapon
Related Articles: Deconstructing the Death Star: A Comprehensive Guide to the Galactic Superweapon
Introduction
With great pleasure, we will explore the intriguing topic related to Deconstructing the Death Star: A Comprehensive Guide to the Galactic Superweapon. Let’s weave interesting information and offer fresh perspectives to the readers.
Table of Content
Deconstructing the Death Star: A Comprehensive Guide to the Galactic Superweapon

The Death Star, a symbol of galactic tyranny and technological prowess, stands as a testament to the creative vision of the Star Wars universe. Its iconic spherical design, coupled with its devastating power, has captivated audiences for decades. This comprehensive guide delves into the intricate map of the Death Star, exploring its various sections and highlighting its strategic importance.
The Death Star: A Technological Marvel
The Death Star, a mobile space station of immense size, was a weapon of unparalleled destructive capability. Its primary function was to instill fear and maintain control through the threat of planetary annihilation. This fearsome weapon was a marvel of engineering, housing an array of advanced technology, including:
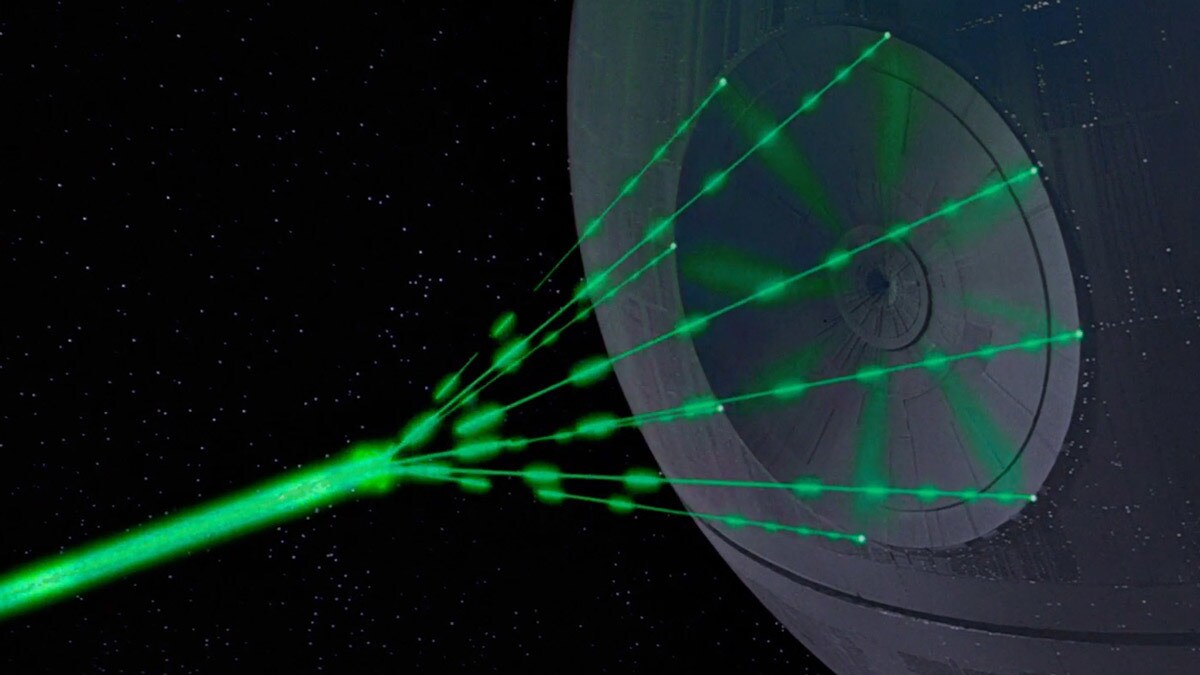
- The Superlaser: The Death Star’s defining feature, the superlaser, was capable of obliterating entire planets with a single shot. This weapon was housed in the station’s core, requiring a significant amount of energy to activate.
- The Reactor: This massive power source fueled the superlaser and provided energy for the station’s other systems. The reactor was a vulnerable point, as its destruction could cripple the entire station.
- The Command Center: This central hub served as the nerve center of the Death Star, housing the station’s command and control systems. It was from here that the superlaser was fired and the station’s operations were managed.
- The Turbolasers: The Death Star was equipped with numerous turbolasers, powerful cannons used to engage enemy ships. These weapons were strategically placed throughout the station, providing a formidable defense against attack.
- The TIE Fighter Hangars: The Death Star housed a large fleet of TIE fighters, starfighters designed for aerial combat. These hangars were strategically located to provide quick access to the station’s defense forces.
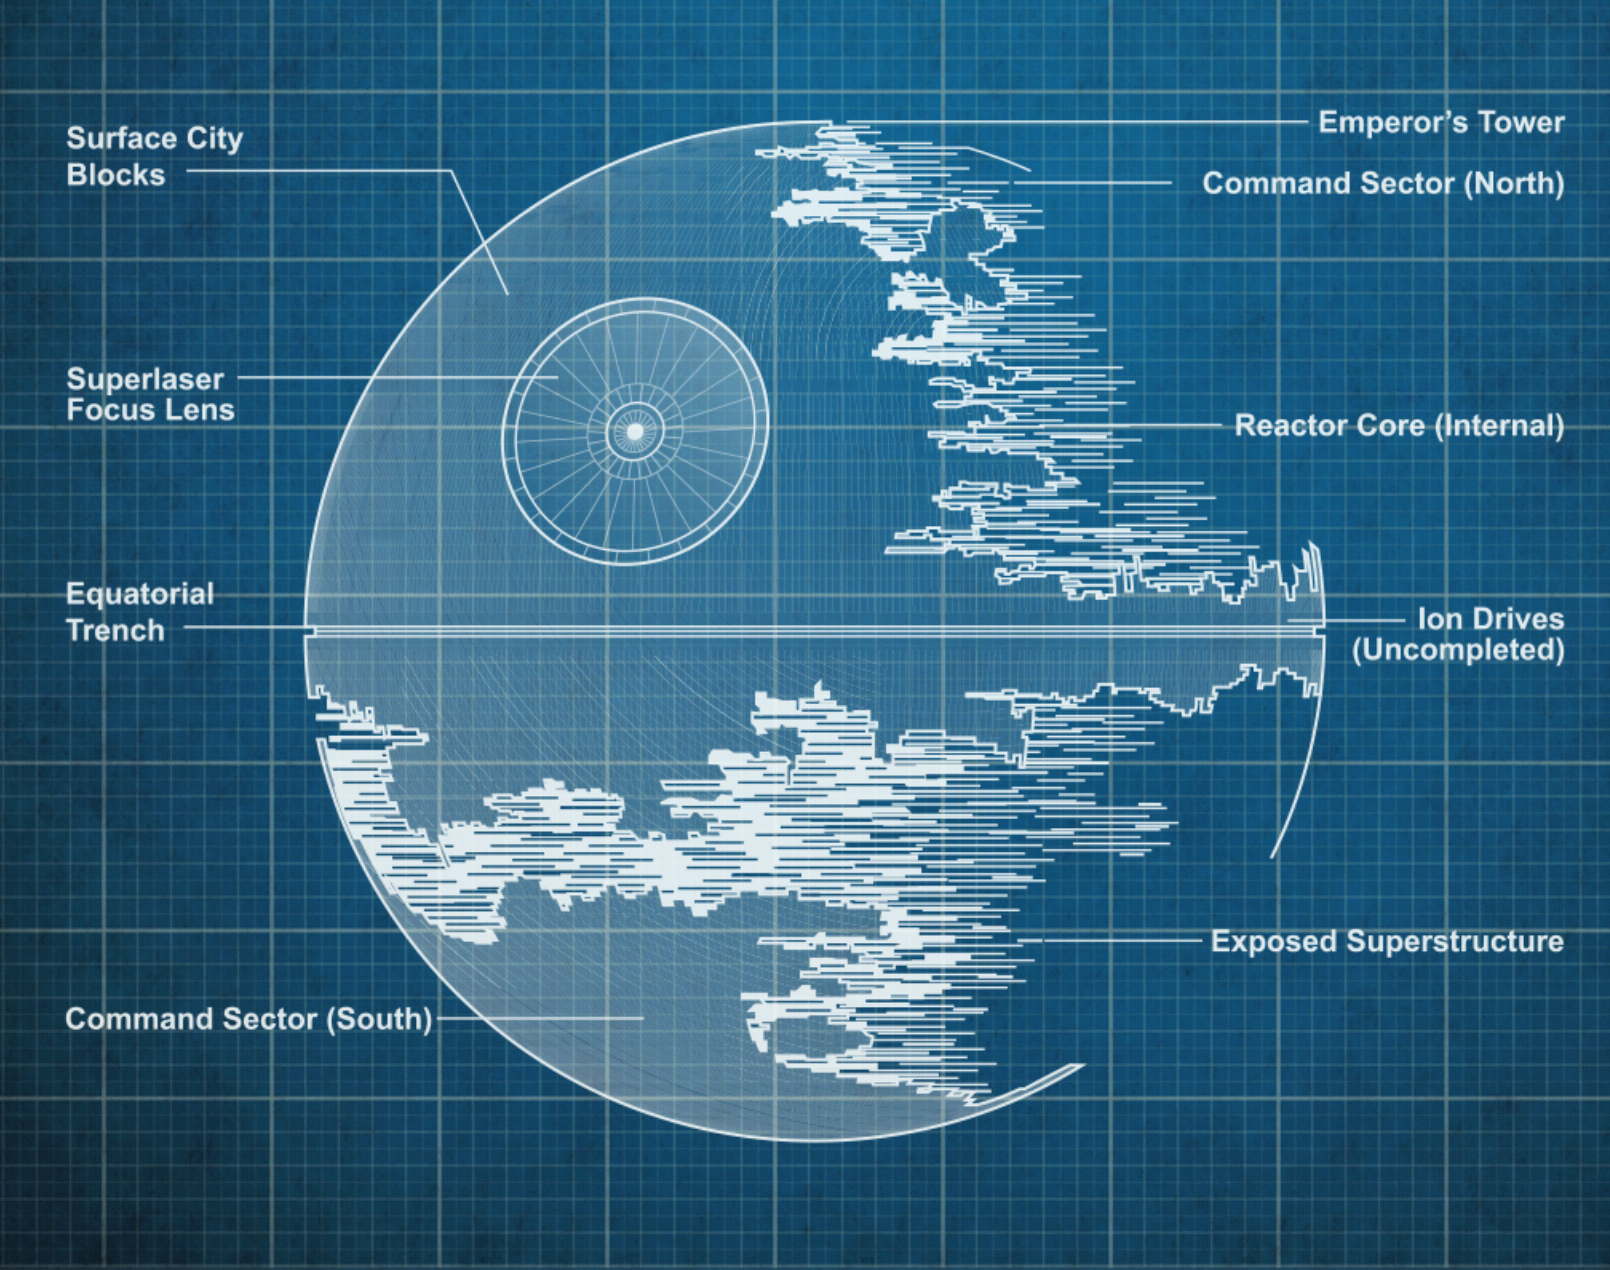
Mapping the Death Star: A Guide to its Structure
The Death Star’s design was a testament to its creators’ ambition and strategic thinking. The station was divided into various sections, each serving a specific function. A detailed map of the Death Star allows for a deeper understanding of its structure and function.
The Core: The heart of the Death Star, the core housed the superlaser and the reactor. This area was heavily fortified and guarded, as its destruction would render the station useless.
The Command Center: Located above the core, the command center was the nerve center of the Death Star. From here, the station’s operations were monitored and directed, including the deployment of its weapons and defenses.
The Hangar Bay: This section housed the Death Star’s TIE fighter fleet, providing quick access to the station’s aerial defense forces.
The Detention Block: This section was used to imprison captured enemies and rebels, providing a secure location for holding prisoners.
The Power Converter: Located in the lower hemisphere, the power converter was responsible for channeling energy from the reactor to the superlaser and other systems.
The Superlaser Charging Chamber: This section housed the superlaser’s charging mechanism, requiring a significant amount of time to charge the weapon.
The Exhaust Port: This vulnerable point was the only known weakness of the Death Star’s shield system, allowing for an attack to penetrate the station’s defenses.
Strategic Importance of the Death Star Map
Understanding the Death Star’s structure was crucial for both its defenders and attackers. For the Galactic Empire, the map served as a guide for managing the station’s resources and deploying its forces effectively. For the Rebel Alliance, the map was essential for planning attacks, identifying weaknesses, and exploiting vulnerabilities.
The Death Star: A Legacy of Destruction and Inspiration
The Death Star’s legacy extends beyond its role as a symbol of fear and oppression. Its intricate design, technological advancements, and strategic importance have inspired generations of fans and creators. The Death Star continues to be a source of fascination and debate, prompting discussions about its construction, its potential for good or evil, and its place in the Star Wars universe.
Frequently Asked Questions about the Death Star Map
Q: What is the purpose of the Death Star map?
A: The Death Star map serves as a visual representation of the station’s structure, allowing for a deeper understanding of its layout, function, and strategic importance.
Q: How was the Death Star map created?
A: The Death Star map was likely created by the Galactic Empire’s engineers and architects during the station’s construction.
Q: Why is the Death Star map important?
A: The Death Star map is important because it provides a critical understanding of the station’s strengths and weaknesses, allowing for effective planning and execution of attacks or defense strategies.
Q: What are some of the key features of the Death Star map?
A: Key features of the Death Star map include the core, the command center, the hangar bay, the detention block, the power converter, the superlaser charging chamber, and the exhaust port.
Q: How can the Death Star map be used to attack the station?
A: The Death Star map can be used to identify vulnerable points, such as the exhaust port, allowing for targeted attacks that can bypass the station’s defenses.
Tips for Understanding the Death Star Map
- Focus on the key features: Pay attention to the core, the command center, the hangar bay, and the exhaust port, as these are the most important areas of the station.
- Consider the station’s defenses: The Death Star’s defenses are formidable, so it’s important to understand how they work and how they can be bypassed.
- Think about the station’s vulnerabilities: The Death Star is not invincible, and there are weaknesses that can be exploited.
- Use the map to plan attacks or defenses: The Death Star map can be a valuable tool for planning attacks or defending against them.
Conclusion
The Death Star map is a vital resource for understanding the structure and function of this iconic weapon. By studying the map, we gain insight into the station’s strategic importance, its strengths and weaknesses, and its place in the Star Wars universe. Whether you’re a casual fan or a dedicated Star Wars enthusiast, understanding the Death Star map is essential for appreciating the complexity and ingenuity of this galactic superweapon.


Closure
Thus, we hope this article has provided valuable insights into Deconstructing the Death Star: A Comprehensive Guide to the Galactic Superweapon. We hope you find this article informative and beneficial. See you in our next article!